في الجزء الأول من المقالة ، سنستخدم محاكي QEMU لـ aarch64 ، في الجزء الثاني ، سنطلق محاكي Raspberry ونتحقق من وظائف التطبيق فيه.
نيابة عني ، أود أن أشير إلى أن كل هذا لا يتم بسرعة ، وإذا حاولت القيام بكل هذا ، فستستغرق الدورة الكاملة عدة أيام!)
بناء من مصادر Qt على CentOS ARM
للتثبيت على نظام مضيف ، نحتاج إلى تثبيت محاكي QEMU. في التوزيعات القائمة على دبيان ، هذه هي الحزمة qemu-system-arm. لإدارة الآلة الافتراضية في الوضع الرسومي ، يمكنك تثبيت Virt-manager.
بعد البدء ، أنشئ جهازًا افتراضيًا:
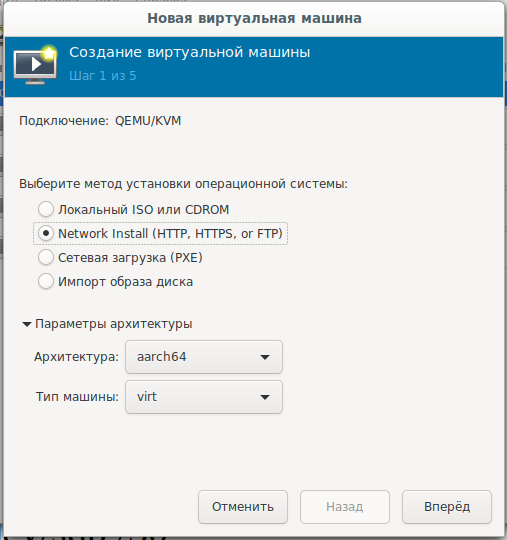
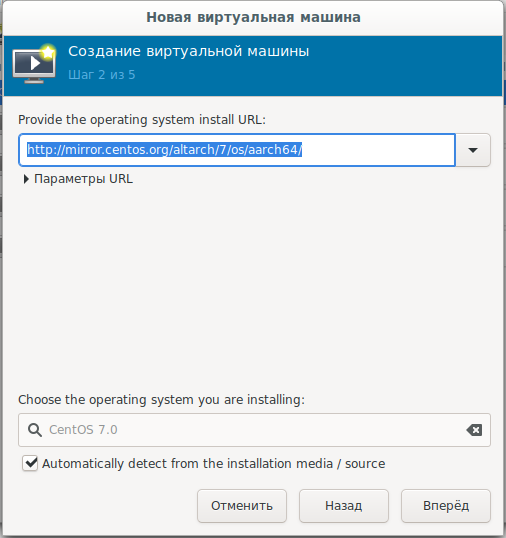
وحدد تمهيد الشبكة من url:
mirror.centos.org/altarch/7/os/aarch64 عيِّن
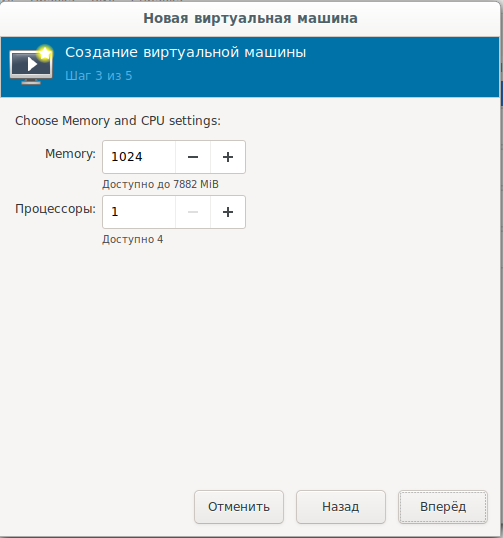
عدد المعالجات وذاكرة الوصول العشوائي:
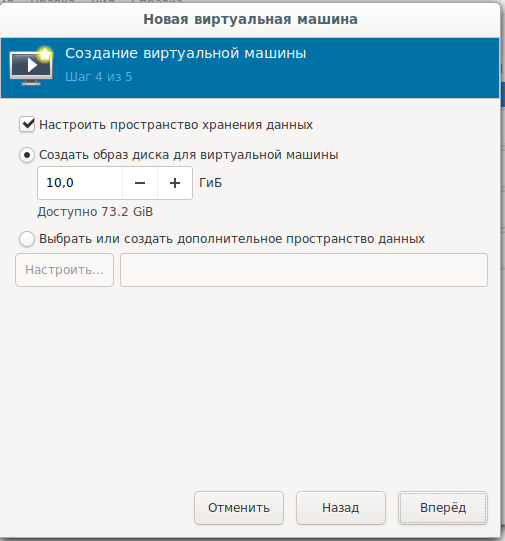
اضبط حجم قرص النظام:
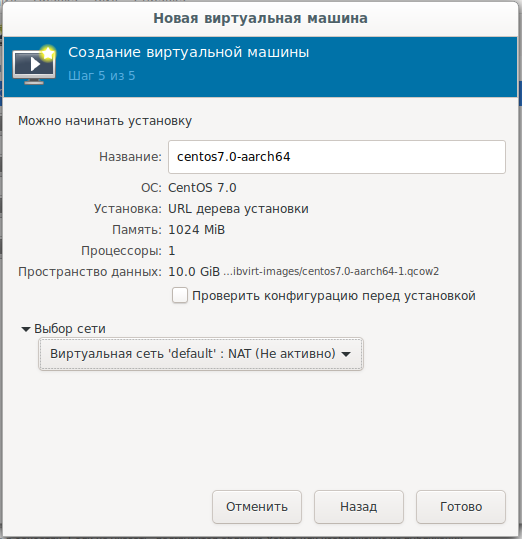
الإعدادات النهائية ، اختيار الشبكة:
بالنسبة لأولئك الذين يرغبون في التنزيل أو التثبيت دون اتصال ، هناك صورة قرص:
arm64
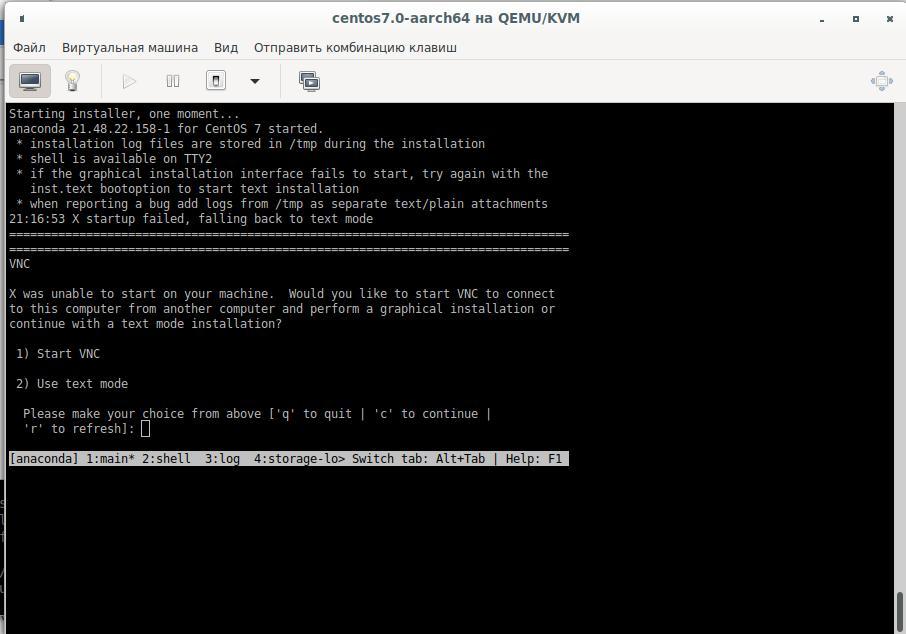
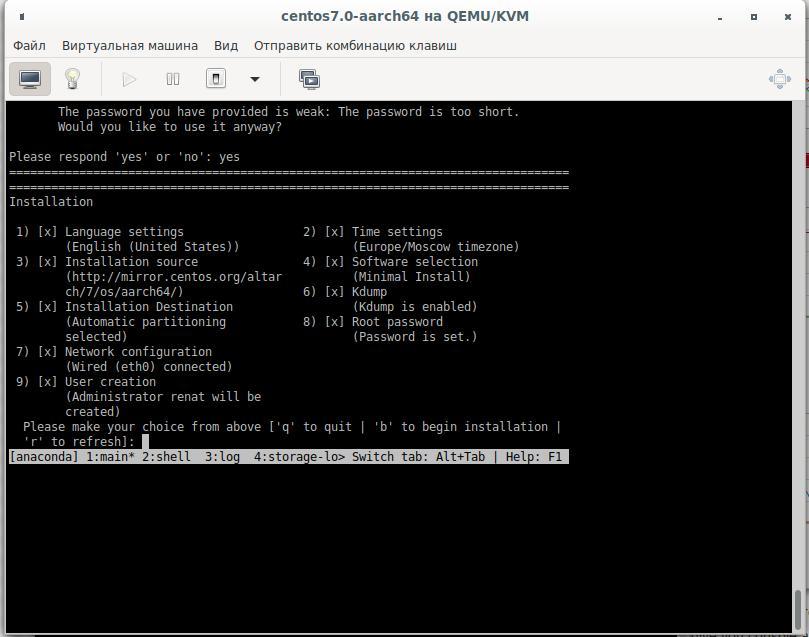
بعد ذلك ، تحتاج إلى تثبيت النظام على القرص الصلب في وضع النص ، واختيار خيارات الإجابة الضرورية ، والتأكيد بإجابات نعم:
سيتم التجميع على القرص الظاهري الثاني ، لذلك سنحتاج إلى قرص 25-30 جيجا بايت. نقوم بإنشاء قرص ثابت جديد عن طريق إغلاق الجهاز الظاهري وتوصيله به ثم تشغيله مرة أخرى. دعنا نكسر القرص الصلب ونقوم بتهيئته:
cfdisk /dev/sdb
mkfs.ext4 /dev/sdb1 -L Qt_Rebuild
mount /dev/sdb1 /30
لماذا نظام الملفات ليس XFS
XFS, Raspberry, .. XFS.
بعد التثبيت ، نتصل بالجهاز الظاهري ونثبت الحزم التي نحتاجها :
yum install centos-release-scl
yum install devtoolset-9-gcc.aarch64
yum install git
export PATH=/opt/rh/devtoolset-9/root/bin/:$PATH
echo clone from git
cd /30
git clone --recursive --single-branch --branch 5.15 git://github.com/qt/qt5.git
cd qt5
التكوين:
./configure -skip qt3d -no-warnings-are-errors -release -recheck-all --prefix /Qt/5.15.0 -opensource -confirm-license -nomake examples -nomake tests -c++std c++17 -I /usr/include/xcb/ -L /usr/lib/x86_64-linux-gnu/ -xcb-xlib -xcb -feature-thread -feature-xkbcommon -qt-libpng -qt-libjpeg -qt-zlib -I /usr/include/xcb/ -L /usr/lib/x86_64-linux-gnu/ --recheck-all
...
You need perl in your PATH to make a build from GIT.
Cannot proceed.

#yum install perl
نكرر إطلاق التكوين ونحصل على:
Creating qmake...
gmake: g++: Command not found
gmake: *** [main.o] Error 127
قم بتثبيت المترجم وتكوينه مرة أخرى:
yum install devtoolset-9-gcc-c++.aarch64
...
ERROR: Feature 'xcb' was enabled, but the pre-condition 'features.thread && libs.xcb && tests.xcb_syslibs && features.xkbcommon-x11' failed.

ERROR: Feature 'xcb-xlib' was enabled, but the pre-condition 'features.xlib && libs.xcb_xlib' failed.

ERROR: Feature 'xkbcommon' was enabled, but the pre-condition 'libs.xkbcommon' failed.

ERROR: The OpenGL functionality tests failed!
You might need to modify the include and library search paths by editing QMAKE_INCDIR_OPENGL[_ES2],
QMAKE_LIBDIR_OPENGL[_ES2] and QMAKE_LIBS_OPENGL[_ES2] in the mkspec for your platform.
نحن نبحث ونسلم الحزم اللازمة:
yum install libxkbcommon-x11-devel
yum install xcb-util-renderutil-devel
yum install libxcb libxcb-devel libXrender libXrender-devel xcb-util-wm xcb-util-wm-devel xcb-util xcb-util-devel xcb-util-image xcb-util-image-devel xcb-util-keysyms xcb-util-keysyms-devel
نقوم بالتهيئة ، ولدينا بالفعل خطأ واحد:
ERROR: Feature 'xcb-xlib' was enabled, but the pre-condition 'features.xlib && libs.xcb_xlib' failed.أضف المزيد من الحزم وانظر إلى سجل التكوين:
 yum install libxcb libxcb-devel xcb-util xcb-util-devel mesa-libGL-devel libxkbcommon-devel
...
Checking for XCB ICCCM >= 0.3.9... yes
Checking for XCB SHM... yes
Checking for XCB Image >= 0.3.9... yes
Checking for XCB Keysyms >= 0.3.9... yes
Checking for XCB RandR... yes
Checking for XCB XRender... yes
Checking for XCB Renderutil >= 0.3.9... yes
Checking for XCB Shape... yes
Checking for XCB Sync... yes
Checking for XCB Xfixes... yes
Checking for XCB Xinerama... yes
Checking for XCB XKB... yes
Checking for XCB (extensions)... yes
Checking for xkbcommon >= 0.5.0... yes
Checking for xkbcommon-x11... yes
…
Checking for XCB Xlib... yes
Checking for XCB GLX... yes
...
Qt is now configured for building. Just run 'gmake'.
Once everything is built, you must run 'gmake install'.
Qt will be installed into '/Qt/5.15.0'.

Prior to reconfiguration, make sure you remove any leftovers from
the previous build.
حسنًا ، كل شيء جاهز ، لكننا نحتاج إلى التحقق من الخيارات التي قد تكون مفيدة لنا:
  OpenGL:
    Desktop OpenGL ....................... yes
    OpenGL ES 2.0 ........................ no
    OpenGL ES 3.0 ........................ no
    OpenGL ES 3.1 ........................ no
    OpenGL ES 3.2 ........................ no

  OpenSSL ................................ no
    Qt directly linked to OpenSSL ........ no
  OpenSSL 1.1 ............................ no
ومع ذلك ، ربما نحتاج إلى تفاعل الشبكة للتطبيق ، فنحن لا نعمل فقط عبر http:
yum install openssl-devel

Dependencies Resolved

================================================================================
 Package                   Arch          Version               Repository  Size
================================================================================
Installing:
 openssl-devel             aarch64       1:1.0.2k-19.el7       base       1.5 M
Installing for dependencies:
 keyutils-libs-devel       aarch64       1.5.8-3.el7           base        37 k
 krb5-devel                aarch64       1.15.1-46.el7         base       272 k
 libcom_err-devel          aarch64       1.42.9-17.el7         base        31 k
 libkadm5                  aarch64       1.15.1-46.el7         base       175 k
 libselinux-devel          aarch64       2.5-15.el7            base       186 k
 libsepol-devel            aarch64       2.5-10.el7            base        76 k
 libverto-devel            aarch64       0.2.5-4.el7           base        11 k
 pcre-devel                aarch64       8.32-17.el7           base       479 k
 zlib-devel                aarch64       1.2.7-18.el7          base        49 k

Transaction Summary
================================================================================
Install  1 Package (+9 Dependent packages)

Total download size: 2.8 M
Installed size: 6.4 M
Is this ok [y/d/N]:
الإصدار 1.0.2k ، وهو أقل مما تطلبه Qt (تمت زيادة الحد الأدنى من الإصدار المدعوم من OpenSSL إلى 1.1. )
سيتعين علينا إنشاء OpenSSL ثم إنشاء Qt من المصدر:
wget https://www.openssl.org/source/openssl-1.1.1g.tar.gz
-bash: wget: command not found
cd /
curl https://www.openssl.org/source/openssl-1.1.1g.tar.gz -o openssl-1.1.1.g.tar.gz
tar -xvf openssl-1.1.1.g.tar.gz
cd /openssl-1.1.1g
perl Configure
echo   ,   ARM:
perl Configure linux-aarch64
Configuring OpenSSL version 1.1.1g (0x1010107fL) for linux-aarch64
Using os-specific seed configuration
Creating configdata.pm
Creating Makefile

**********************************************************************
***                                                                ***
***   OpenSSL has been successfully configured                     ***
***                                                                ***
***   If you encounter a problem while building, please open an    ***
***   issue on GitHub <https://github.com/openssl/openssl/issues>  ***
***   and include the output from the following command:           ***
***                                                                ***
***       perl configdata.pm --dump                                ***
***                                                                ***
***   (If you are new to OpenSSL, you might want to consult the    ***
***   'Troubleshooting' section in the INSTALL file first)         ***
***                                                                ***
**********************************************************************
make && make install
ثم نقوم مرة أخرى بتكوين Qt والبدء في بنائه باستخدام الأمر make أو make -j4 ، وفقًا لعدد المعالجات (إذا قررت إنشاء جهاز افتراضي بأربعة معالجات) ، والتي تم تحديدها في إعدادات الجهاز الظاهري .
تعطل بناء التطبيق في:
make[3]: Entering directory `/30/qt5/qtsvg/src/svg'
g++ -c -include .pch/Qt5Svg -pipe -O2 -std=c++1z -fvisibility=hidden -fvisibility-inlines-hidden -fno-exceptions -Wall -Wextra -Wvla -Wdate-time -Wshift-overflow=2 -Wduplicated-cond -Wno-stringop-overflow -Wno-format-overflow -D_REENTRANT -fPIC -DQT_NO_LINKED_LIST -DQT_NO_FOREACH -DQT_NO_USING_NAMESPACE -DQT_NO_NARROWING_CONVERSIONS_IN_CONNECT -DQT_BUILD_SVG_LIB -DQT_BUILDING_QT -DQT_NO_CAST_TO_ASCII -DQT_ASCII_CAST_WARNINGS -DQT_MOC_COMPAT -DQT_USE_QSTRINGBUILDER -DQT_DEPRECATED_WARNINGS -DQT_DISABLE_DEPRECATED_BEFORE=0x050000 -DQT_DEPRECATED_WARNINGS_SINCE=0x060000 -DQT_NO_EXCEPTIONS -D_LARGEFILE64_SOURCE -D_LARGEFILE_SOURCE -DQT_NO_DEBUG -DQT_WIDGETS_LIB -DQT_GUI_LIB -DQT_CORE_LIB -DQT_ZLIB_LIB -I. -I../../include -I../../include/QtSvg -I../../include/QtSvg/5.15.0 -I../../include/QtSvg/5.15.0/QtSvg -I/30/qt5/qtbase/include/QtWidgets/5.15.0 -I/30/qt5/qtbase/include/QtWidgets/5.15.0/QtWidgets -I/30/qt5/qtbase/include/QtGui/5.15.0 -I/30/qt5/qtbase/include/QtGui/5.15.0/QtGui -I/30/qt5/qtbase/include/QtCore/5.15.0 -I/30/qt5/qtbase/include/QtCore/5.15.0/QtCore -I/30/qt5/qtbase/include -I/30/qt5/qtbase/include/QtWidgets -I/30/qt5/qtbase/include/QtGui -I/30/qt5/qtbase/include/QtCore -I/30/qt5/qtbase/include/QtZlib -I/30/qt5/qtbase/include/QtZlib/5.15.0 -I/30/qt5/qtbase/include/QtZlib/5.15.0/QtZlib -I.moc -I/usr/include/libdrm -I/usr/include/xcb -I/usr/include/xcb -I/30/qt5/qtbase/mkspecs/linux-g++ -o .obj/qsvgfont.o qsvgfont.cpp
In file included from /30/qt5/qtbase/include/QtGui/qopenglversionfunctions.h:1,
                 from /30/qt5/qtbase/include/QtGui/../../src/gui/kernel/qopenglcontext.h:61,
                 from /30/qt5/qtbase/include/QtGui/qopenglcontext.h:1,
                 from /30/qt5/qtbase/include/QtGui/QtGui:49,
                 from ../../include/QtSvg/QtSvgDepends:4:
/30/qt5/qtbase/include/QtGui/../../src/gui/opengl/qopenglversionfunctions.h: In instantiation of ‘class QVector<double>’:
qsvgstyle_p.h:696:20:   required from here
/30/qt5/qtbase/include/QtGui/../../src/gui/opengl/qopenglversionfunctions.h:201:5: internal compiler error: in tsubst_function_decl, at cp/pt.c:12967
  201 |     QAbstractOpenGLFunctionsPrivate()
      |     ^~~~~~~~~~~~~~~~~~~~~~~~~~~~~~~
Please submit a full bug report,
with preprocessed source if appropriate.
See <http://bugzilla.redhat.com/bugzilla> for instructions.
make[3]: *** [.obj/qsvgfont.o] Error 1
make[3]: Leaving directory `/30/qt5/qtsvg/src/svg'
make[2]: *** [sub-svg-make_first-ordered] Error 2
make[2]: Leaving directory `/30/qt5/qtsvg/src'
make[1]: *** [sub-src-make_first] Error 2
make[1]: Leaving directory `/30/qt5/qtsvg'
make: *** [module-qtsvg-make_first] Error 2
نقوم بتثبيت إصدارات إضافية من الحزم وفي المحاولة الثالثة نحصل عليها:
-
yum install harfbuzz-devel yum install at-spi2-atk-devel at-spi2-core-devel dbus-devel glib2-devel graphite2-devel keyutils-libs-devel krb5-devel libcom_err-devel libicu-devel libselinux-devel libsepol-devel libverto-devel pcre-devel zlib-devel-
yum install mesa-libGLw-devel
التكوين والتجميع قيد التقدم. نقوم بإنشاء تطبيق اختبار في QtCreator (مع التجميع qmake) ، ونسخ المصادر إلى الجهاز الظاهري وبناء التطبيق. Binar جاهز ، ويبقى اختباره على Raspberry.
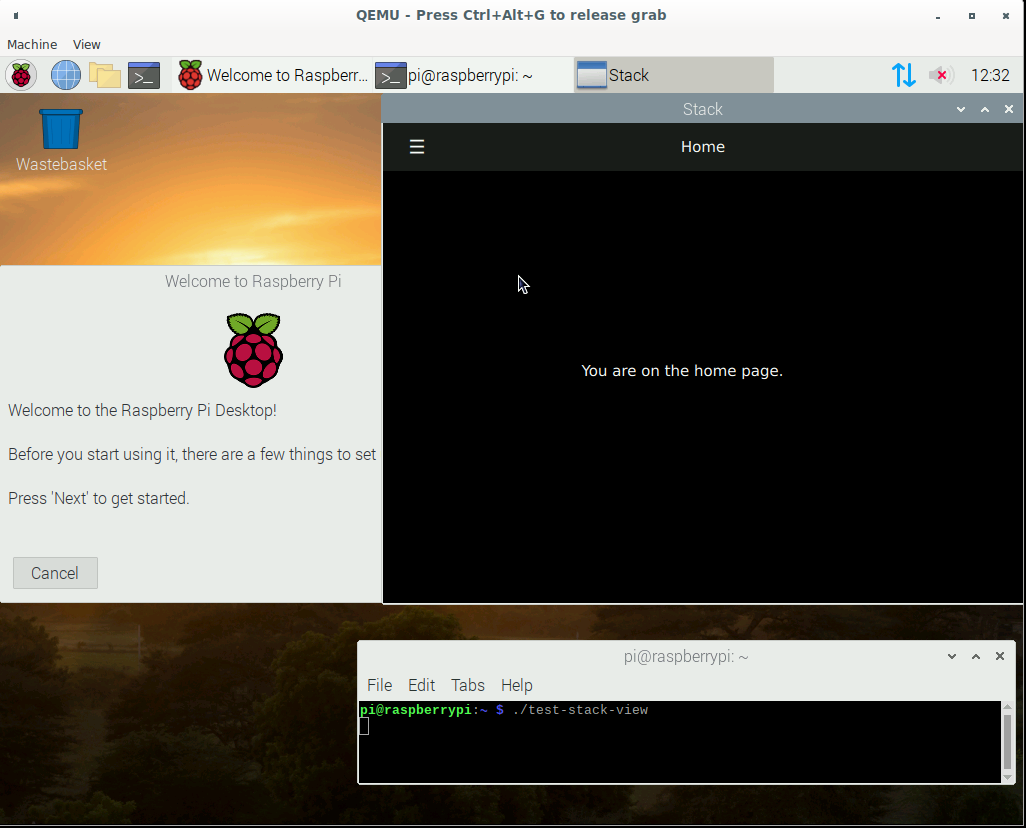
2. تشغيل في محاكي Raspberry
نظرًا لأننا في إطار هذه المقالة نقوم بمحاكاة معالج ARM ، فهذا يعني أننا سنعمل أيضًا في رابط جهاز افتراضي 1 رابط 2 رابط 3 :
قم بتنزيل الصورة الرسمية من موقع Raspberry على الويب ، نواة المحاكي وتشغيل (لقد قمت بإنشاء ملف بدء التشغيل):
echo create disk for Qt sources and Projects
qemu-img create -f qcow2 qt-rebuild-25gb-disk.qcow2 25G
cat start-emul.sh
#!/bin/bash

path_img=/home/user/Project/qemu
path_kernel=/home/user/qemu/qemu-rpi-kernel
sudo qemu-system-arm -kernel $path_kernel/kernel-qemu-4.19.50-buster -dtb $path_kernel/versatile-pb-buster.dtb \
-cpu arm1176 -m 256 -M versatilepb -append "root=/dev/sda2 rw" -net nic -net user,hostfwd=tcp::5022-:22 \
-net tap,ifname=vnet0,script=no,downscript=no -hdb $path_img/qt-rebuild-25gb-disk.qcow2 -no-reboot -hda $path_img/2020-05-27-raspios-buster-armhf.img
نحاول إطلاق تطبيقنا:
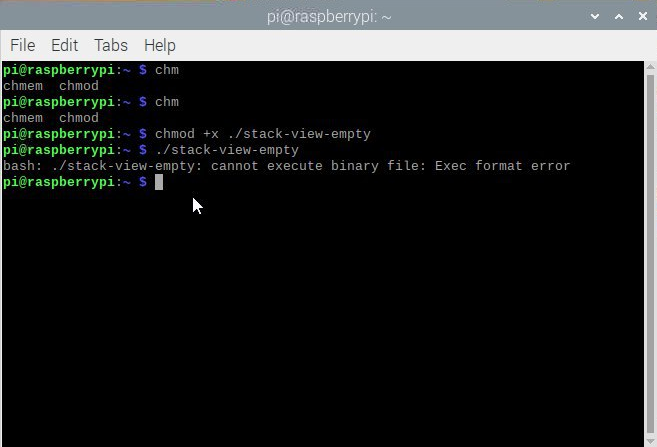
لماذا هذا؟ ننظر إلى المعالج:
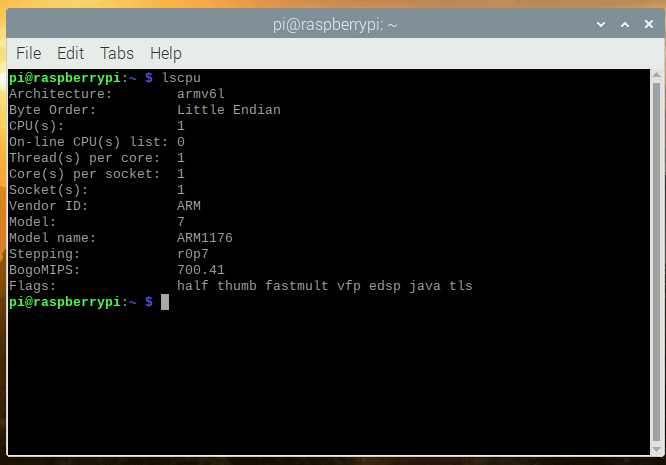
ننظر إلى ملف التكوين في CentOS:
[root@aaarch-qemu qt5]# cat config.summary |grep CPU
Build type: linux-g++ (arm64, CPU features: cx16 neon)
حسنًا ، قمنا بتجميع تطبيق armv8 64 بت ونحاول تشغيله في محاكي 32 بت بمعالج armv6. آمل أن يتمكن مالكو الأجهزة الحقيقية المزودة بمعالجات 64 بت جديدة من إلغاء الاشتراك في التعليقات سواء تمكنوا من تشغيل التطبيق على جهاز حقيقي أم لا.
حسنًا ، لا يهم ، يمكننا الآن جمع محاكي Raspberry؟ نجد أن مساحة القرص الحرة لدينا قليلة جدًا بعد استدعاء الأمر df -h. كانت أسهل طريقة هي نسخ ملف الصورة ، وتكبيره ، وبدء تشغيل جهاز افتراضي بنظامين للملفات عن طريق زيادة قسم الجذر على الجهاز الثاني ، ثم استخدام الصورة الثانية. اذهب:
qemu-img convert 2020-05-27-raspios-buster-armhf.img 2020-05-27-raspios-buster-armhf-10gb.qcow2 -O qcow2 -p
qemu-img resize 2020-05-27-raspios-buster-armhf-10gb.qcow2 +6G
أضف محرك أقراص
ثابتًا آخر إلى البرنامج النصي لبدء التشغيل: -hdc 2020-05-27-raspios-buster-armhf-10gb.qcow2
بعد البدء ، قم بتحرير محرك الأقراص الثابتة sudo cfdisk / dev / sdc:
تغيير الحجم:

اكتب وتأكد من نعم:
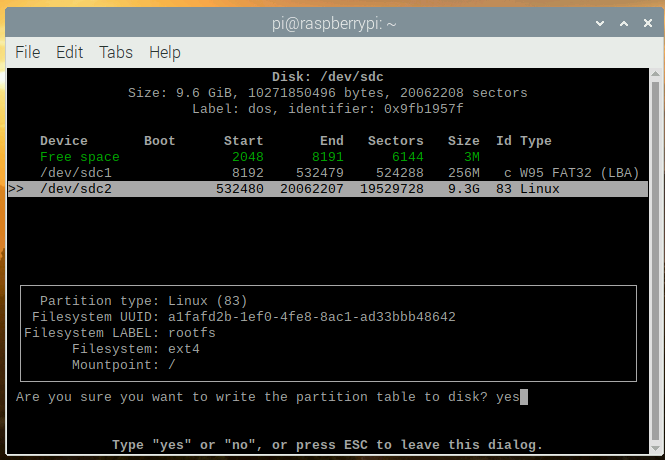
لا تنس التحقق ، أن القرص أصبح بالحجم الذي نحتاجه:
sudo mkdir /test
sudo mount /dev/sdc2 /test
df -h
Filesystem      Size  Used Avail Use% Mounted on
/dev/root       3.2G  2.8G  257M  92% /
devtmpfs        124M     0  124M   0% /dev
tmpfs           124M     0  124M   0% /dev/shm
tmpfs           124M  2.0M  122M   2% /run
tmpfs           5.0M     0  5.0M   0% /run/lock
tmpfs           124M     0  124M   0% /sys/fs/cgroup
/dev/sdc1       253M   51M  202M  21% /boot
tmpfs            25M     0   25M   0% /run/user/1000
/dev/sdc2       3.2G  2.7G  358M  89% /test
لم تتم إضافة شيء ما بحجم قرص sdc المتصل بالمجلد / test ، فلنصلحه:
sudo umount /test
sudo fsck -f /dev/sdc2
sudo resize2fs /dev/sdc2
resize2fs 1.44.5 (15-Dec-2018)
Please run 'e2fsck -f /dev/sdc2' first.

pi@raspberrypi:~ $ e2fsck -f /dev/sdc2
e2fsck 1.44.5 (15-Dec-2018)
e2fsck: Permission denied while trying to open /dev/sdc2
You must have r/w access to the filesystem or be root
pi@raspberrypi:~ $ sudo e2fsck -f /dev/sdc2
e2fsck 1.44.5 (15-Dec-2018)
Pass 1: Checking inodes, blocks, and sizes
Pass 2: Checking directory structure
Pass 3: Checking directory connectivity
Pass 4: Checking reference counts
Pass 5: Checking group summary information
rootfs: 106640/217296 files (0.3% non-contiguous), 729343/868352 blocks
pi@raspberrypi:~ $ sudo resize2fs /dev/sdc2
resize2fs 1.44.5 (15-Dec-2018)
Resizing the filesystem on /dev/sdc2 to 2441216 (4k) blocks.
The filesystem on /dev/sdc2 is now 2441216 (4k) blocks long.

sudo mount /dev/sdc2 /test
pi@raspberrypi:~ $ df -h
Filesystem      Size  Used Avail Use% Mounted on
/dev/root       3.2G  2.8G  259M  92% /
devtmpfs        124M     0  124M   0% /dev
tmpfs           124M     0  124M   0% /dev/shm
tmpfs           124M  2.0M  122M   2% /run
tmpfs           5.0M     0  5.0M   0% /run/lock
tmpfs           124M     0  124M   0% /sys/fs/cgroup
/dev/sdc1       253M   51M  202M  21% /boot
tmpfs            25M     0   25M   0% /run/user/1000
/dev/sdc2       9.2G  2.7G  6.0G  31% /test
قم بإيقاف تشغيل الآلة الافتراضية. قم بتحرير ملف start-emul.sh مرة أخرى ، واستبدل محرك الأقراص الثابتة hda بآخر جديد ، وقم بإزالة الرابط إلى القرص الصلب الثالث hdc. لدينا الآن نظام ملفات به مساحة أكبر.
الآن يمكننا توصيل القرص الصلب بمصادر Qt من الجهاز الظاهري الأول.
نصيحة: من الأفضل "تنظيف المصادر" من الملفات المؤقتة ، أي إعادة حالة git الخاصة بنا ، والتي كانت وقت استنساخ المستودع قبل التكوين:
cd /30/qt5
git reset --hard
git submodule foreach --recursive 'git reset HEAD . || :'
git submodule foreach --recursive 'git checkout -- . || :'
git clean -d -f -f -x
git submodule foreach --recursive git clean -d -f -f -x
لذلك نحتاج في دبيان إلى:
sudo apt install gcc-arm-none-eabi
sudo apt install wget build-essential \
 ^libxcb.*-dev \
libopenal-dev \
flite1-dev   libspeechd-dev \
libudev-dev \
libinput-dev \
libxkbcommon-x11-dev curl libssl-dev time -y

sudo apt install libx11-dev -y \
    libfontconfig1-dev \
    libfreetype6-dev \
    libx11-dev \
    libxext-dev \
    libxfixes-dev \
    libxi-dev \
    libxrender-dev \
    libxcb1-dev \
    libx11-xcb-dev \
    libxcb-glx0-dev \
    libxkbcommon-x11-dev \
    mesa-common-dev \
libgl1-mesa-dev
التكوين:
cd /30/qt5
./configure -skip qt3d -no-warnings-are-errors -release -recheck-all -prefix /Qt/5.15.0 -opensource -confirm-license -nomake examples -nomake tests -c++std c++17 -I /usr/include/xcb/ -L /usr/lib/x86_64-linux-gnu/ -xcb-xlib -xcb -feature-thread -feature-xkbcommon -qt-libpng -qt-libjpeg -qt-zlib -I /usr/include/xcb/ -L /usr/lib/x86_64-linux-gnu/ --recheck-all -skip wayland -skip qtwebengine -skip qtwayland
يتم أيضًا الحصول على أخطاء:
ERROR: Feature 'xcb-xlib' was enabled, but the pre-condition 'features.xlib && libs.xcb_xlib' failed.

ERROR: The OpenGL functionality tests failed!
You might need to modify the include and library search paths by editing QMAKE_INCDIR_OPENGL[_ES2],
QMAKE_LIBDIR_OPENGL[_ES2] and QMAKE_LIBS_OPENGL[_ES2] in the mkspec for your platform.
مجلس. هل قمت بكتابة هذه الأوامر في النافذة الرسومية QEMU؟ لا تنس ، لدينا ssh: يجب أن تبدأ في الجهاز الظاهري لخادم ssh: sudo systemctl start ssh && sudo systemctl يمكّن ssh والاتصال بالجهاز الظاهري من الكمبيوتر المحلي ssh pi @ localhost -p 5022 user pi password raspberry
تثبيت حزم مطورين أخرى:
sudo apt install wget build-essential  ^libxcb.*-dev libopenal-dev flite1-dev   libspeechd-dev libudev-dev libinput-dev libxkbcommon-x11-dev curl libssl-dev time -y
sudo apt install libasound2-dev libavcodec-dev libclipper-dev libdbus-1-dev libdrm-dev libegl-dev libgles2-mesa-dev
sudo  apt install libx11-dev libfontconfig1-dev libfreetype6-dev libx11-dev libxext-dev libxfixes-dev libxi-dev libxrender-dev libxcb1-dev libx11-xcb-dev libxcb-glx0-dev libxkbcommon-x11-dev mesa-common-dev libgl1-mesa-dev
نقوم بتكوين نتائج التكوين والحصول عليها:
time ./configure -skip qt3d -no-warnings-are-errors -release -recheck-all -prefix /Qt/5.15.0 -opensource -confirm-license -nomake examples -nomake tests -c++std c++17 -I /usr/include/xcb/ -L /usr/lib/x86_64-linux-gnu/ -xcb-xlib -xcb -feature-thread -feature-xkbcommon -qt-libpng -qt-libjpeg -qt-zlib -I /usr/include/xcb/ -L /usr/lib/x86_64-linux-gnu/ --recheck-all -skip wayland -skip qtwebengine -skip qtwayland
............Done.
Info: creating super cache file /30/qt5/.qmake.super
Info: creating cache file /30/qt5/.qmake.cache
Info: creating stash file /30/qt5/.qmake.stash
This is the Qt Open Source Edition.
You have already accepted the terms of the Open Source license.
Running configuration tests…
…
Note: Option 'cache_use' with value 'none' was specified twice
Note: Also available for Linux: linux-clang linux-icc
Note: Disabling X11 Accessibility Bridge: D-Bus or AT-SPI is missing.
WARNING: QDoc will not be compiled, probably because libclang could not be located. This means that you cannot build the Qt documentation.
Either ensure that llvm-config is in your PATH environment variable, or set LLVM_INSTALL_DIR to the location of your llvm installation.
On Linux systems, you may be able to install libclang by installing the libclang-dev or libclang-devel package, depending on your distribution.
On macOS, you can use Homebrew's llvm package.
On Windows, you must set LLVM_INSTALL_DIR to the installation path.
Qt is now configured for building. Just run 'make'.
Once everything is built, you must run 'make install'.
Qt will be installed into '/Qt/5.15.0'.
Prior to reconfiguration, make sure you remove any leftovers from
the previous build.
real 91m49.471s
user 78m43.608s
sys 7m22.934s
إخراج معلومات حول نتيجة التكوين
أولئك الذين قرأوا حتى هذه النقطة والذين ما زالوا لديهم الحماس لتجربتها ، سيكون من المثير للاهتمام الحصول على نتيجة
الآن ، سيستغرق نواة واحدة من جهاز الكمبيوتر وقتًا طويلاً جدًا لبناء Qt وربما الإنشاء ، وربما يظهر خطأ بعدم وجود ذاكرة كافية أو خطأ أثناء الإنشاء. للقيام بذلك ، أوصي بإنشاء ملف مبادلة لـ1-1.5 جيجا بايت وتوصيله:
sudo dd if=/dev/zero of=/30/swap1500 bs=256M count=6 status=progress
dd: memory exhausted by input buffer of size 268435456 bytes (256 MiB)

sudo dd if=/dev/zero of=/30/swap1500 bs=128M count=12 status=progress
1610612736 bytes (1.6 GB, 1.5 GiB) copied, 82 s, 19.6 MB/s
12+0 records in
12+0 records out
1610612736 bytes (1.6 GB, 1.5 GiB) copied, 82.223 s, 19.6 MB/s

sudo chmod 600 /30/swap1500
sudo mkswap /30/swap1500
Setting up swapspace version 1, size = 1.5 GiB (1610608640 bytes)
no label, UUID=af79f154-6904-4b6d-8c1d-61890bdda556

sudo swapon /30/swap1500

free
              total        used        free      shared  buff/cache   available
Mem:         252228       24652      142532         536       85044      179184
Swap:       1675256       69888     1605368
نقوم بجمع وتثبيت:
make && sudo make installإذا كانت هناك حاجة إلى وحدات إضافية ، فيمكننا دائمًا إضافتها ، على سبيل المثال ، لـ qtquickcontrols2:
export PATH=/Qt/5.15.0/bin:$PATH
cd /30/qt5/qtuickcontrols2/
qmake
make && sudo make install
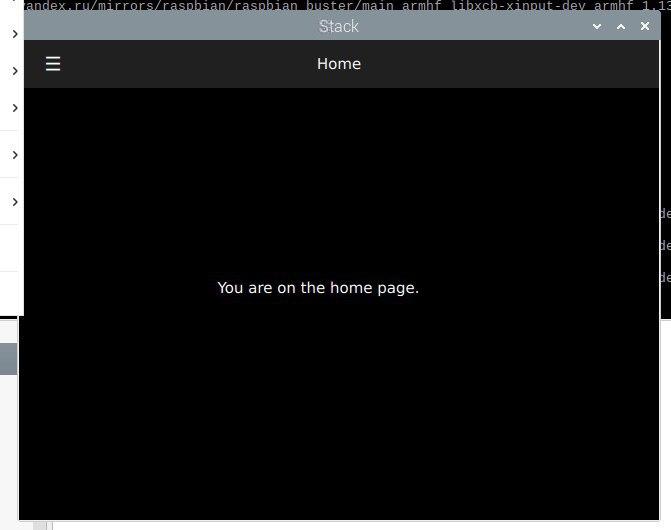
بعد ذلك نجمع التطبيق ونطلقه:
خاتمة
من الممكن إنشاء تطبيقات لـ ARM على أجهزة x86 باستخدام محاكي QEMU. ظننت أنني سأكتب هذا المقال في أسبوع واحد ، لكن العملية استمرت لمدة ثلاثة أسابيع تقريبًا ، لأن كل مرحلة تستغرق وقتًا طويلاً (تثبيت النظام ، وتحديث النظام ، وتثبيت حزم التطوير ، وكذلك الحصول على أكواد Qt المصدر من github). على سبيل المثال ، استغرق إنشاء الإصدار الثابت من Qt في محاكي Raspberry 1426 دقيقة.
هل هو أسرع؟ نعم ، إنها تسمى Cross build. للقيام بذلك ، قم بتكوين sysroot ، وتثبيت مترجم ARM ، وتكوين وبناء Qt على نظامك المضيف. ثم قاموا بتهيئة QtCreator لاستخدام هذا الإصدار من Qt وإنشاء التطبيق على جهاز الكمبيوتر / الكمبيوتر المحمول x86 الخاص بهم ، والحصول على إصدار يعمل في نظام Linux المضمن. رابط 1 رابط 2لان هذا بالفعل خارج نطاق هذا المقال ، ربما سأكتب عن هذا إذا كان لدي الوقت أو الإلهام ، ولكن ربما يكتب شخص آخر كيفية القيام بذلك لأحدث إصدار من Qt 5.15.
حسنًا ، أكرر ، إذا أراد شخص ما تكرار الخطوات من الفصل الثاني لمحاكي ARM Raspberry ، فيمكنك كتابة المدة التي تستغرقها لإنشاء qmake ومرحلة التكوين ، مع الإشارة إلى المعالج الخاص بك في التعليقات.
شكرآ لك على أهتمامك. حظا سعيدا مع إبداعك!