
يوم جيد ، أيها الأصدقاء!
أثناء تطوير قالب كاتب HTML الحديث ، فكرت في توسيع إمكانية استخدامه. في ذلك الوقت ، اقتصرت خيارات استخدامه على استنساخ المستودع وتنزيل الأرشيف. هذه هي الطريقة التي ظهر بها مقتطف HTML وامتداده لـ Microsoft Visual Studio Code - قالب HTML ، بالإضافة إلى واجهة سطر الأوامر - إنشاء قالب حديث . بالطبع ، هذه الأدوات بعيدة كل البعد عن الكمال وسأقوم بتحسينها بقدر ما أستطيع. ومع ذلك ، أثناء عملية إنشائها ، تعلمت بعض الأشياء المثيرة للاهتمام التي أريد مشاركتها معك.
تمت تغطية المقتطف والتوسيع في الجزء الأول... في هذا الجزء ، سوف نلقي نظرة على CLI.
إذا كنت مهتمًا فقط بالشفرة المصدرية ، فإليك رابط المستودع .
أوكليف
Oclif هو إطار عمل Heroku لبناء واجهات سطر الأوامر.
سنستخدمها لإنشاء خدعة توفر القدرة على إضافة وتحديث وحذف المهام وعرض قائمتهم.
الكود المصدري للمشروع هنا . هناك أيضًا CLI للتحقق من وظائف الموقع عن طريق URL.
قم بتثبيت oclif عالميًا:
npm i -g oclif / yarn global add oclif
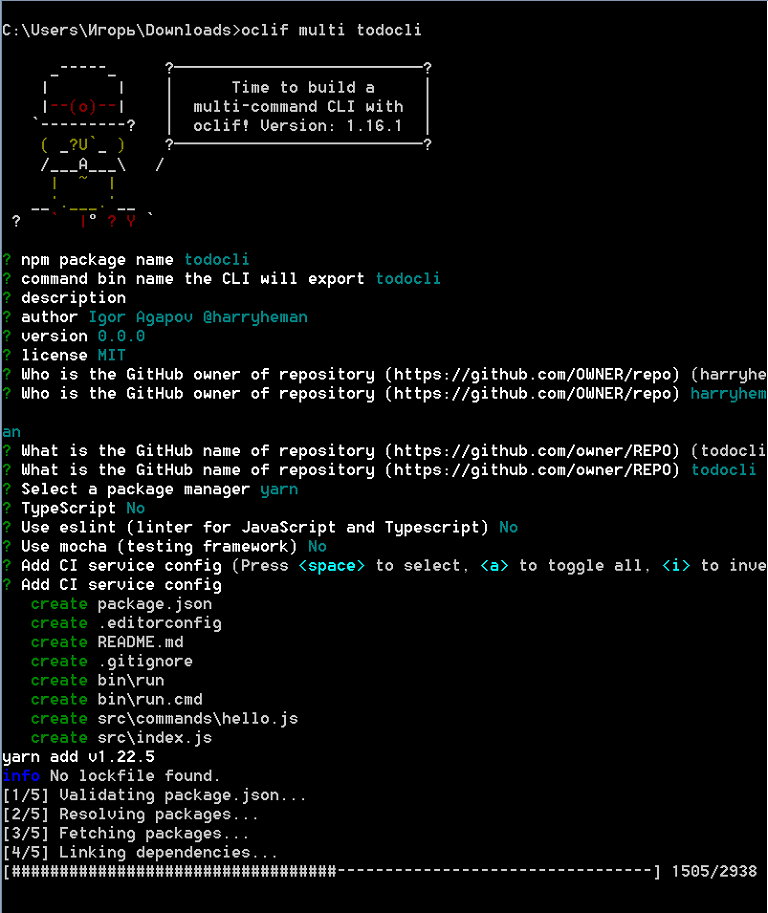
يوفر Oclif القدرة على إنشاء CLIs أحادية ومتعددة الأوامر. نحن بحاجة إلى خيار ثان.
نقوم بإنشاء مشروع:
oclif multi todocli
- تخبر الوسيطة المتعددة oclif بإنشاء واجهة متعددة الأوامر
- todocli - اسم المشروع
أضف الأوامر اللازمة:
oclif command add oclif command update oclif command remove oclif command show
يمكن حذف ملف src / commands / hello.js.
سوف نستخدم lowdb كقاعدة بيانات محلية . سنستخدم أيضًا الطباشير لتخصيص الرسائل المعروضة في المحطة . قم بتثبيت هذه المكتبات:
npm i chalk lowdb / yarn add chalk lowdb
قم بإنشاء ملف db.json فارغ في الدليل الجذر. سيكون هذا مستودع مهمتنا.
في دليل src ، أنشئ ملف db.js بالمحتوى التالي:
const low = require('lowdb')
const FileSync = require('lowdb/adapters/FileSync')
const adapter = new FileSync('db.json')
const db = low(adapter)
// todos db.json
db.defaults({ todos: [] }).write()
//
const Todo = db.get('todos')
module.exports = Todo
تحرير ملف src / commands / add.js:
//
const { Command } = require('@oclif/command')
const Todo = require('../db')
const chalk = require('chalk')
class AddCommand extends Command {
async run() {
//
const { argv } = this.parse(AddCommand)
try {
//
await Todo.push({
id: Todo.value().length,
// ,
//
task: argv.join(' '),
done: false
}).write()
//
this.log(chalk.green('New todo created.'))
} catch {
//
this.log(chalk.red('Operation failed.'))
}
}
}
//
AddCommand.description = `Adds a new todo`
//
AddCommand.strict = false
//
module.exports = AddCommand
تحرير ملف src / commands / update.js:
const { Command } = require('@oclif/command')
const Todo = require('../db')
const chalk = require('chalk')
class UpdateCommand extends Command {
async run() {
//
const { id } = this.parse(UpdateCommand).args
try {
// id
await Todo.find({ id: parseInt(id, 10) })
.assign({ done: true })
.write()
this.log(chalk.green('Todo updated.'))
} catch {
this.log('Operation failed.')
}
}
}
UpdateCommand.description = `Marks a task as done by id`
//
UpdateCommand.args = [
{
name: 'id',
description: 'todo id',
required: true
}
]
module.exports = UpdateCommand
يبدو ملف src / commands / remove.js كما يلي:
const { Command } = require('@oclif/command')
const Todo = require('../db')
const chalk = require('chalk')
class RemoveCommand extends Command {
async run() {
const { id } = this.parse(RemoveCommand).args
try {
await Todo.remove({ id: parseInt(id, 10) }).write()
this.log(chalk.green('Todo removed.'))
} catch {
this.log(chalk.red('Operation failed.'))
}
}
}
RemoveCommand.description = `Removes a task by id`
RemoveCommand.args = [
{
name: 'id',
description: 'todo id',
required: true
}
]
module.exports = RemoveCommand
أخيرًا ، قم بتحرير ملف src / commands / show.js:
const { Command } = require('@oclif/command')
const Todo = require('../db')
const chalk = require('chalk')
class ShowCommand extends Command {
async run() {
// id
const res = await Todo.sortBy('id').value()
//
//
if (res.length) {
res.forEach(({ id, task, done }) => {
this.log(
`[${
done ? chalk.green('DONE') : chalk.red('NOT DONE')
}] id: ${chalk.yellowBright(id)}, task: ${chalk.yellowBright(task)}`
)
})
//
} else {
this.log('There are no todos.')
}
}
}
ShowCommand.description = `Shows existing tasks`
module.exports = ShowCommand
كونك في الدليل الجذر للمشروع ، قم بتنفيذ الأمر التالي:
npm link / yarn link

بعد ذلك ، نقوم بإجراء عدة عمليات.

غرامة. كل شيء يعمل كما هو متوقع. كل ما تبقى هو تحرير package.json و README.md ، ويمكنك نشر الحزمة في سجل npm.
DIY CLI
سيشبه CLI الخاص بنا إنشاء-تفاعل-تطبيق أو vue-cli في الوظائف . في أمر الإنشاء ، سيتم إنشاء مشروع في الدليل الهدف يحتوي على جميع الملفات اللازمة لعمل التطبيق. بالإضافة إلى ذلك ، ستوفر القدرة على تهيئة تبعيات git وتثبيت اختياريًا.
الكود المصدري للمشروع هنا .
قم بإنشاء دليل وتهيئة المشروع:
mkdir create-modern-template cd create-modern-template npm init -y / yarn init -y
قم بتثبيت المكتبات المطلوبة:
yarn add arg chalk clear esm execa figlet inquirer listr ncp pkg-install
- arg - أداة لتحليل وسيطات سطر الأوامر
- clear —
- esm — , ES6- Node.js
- execa — ( git)
- figlet —
- inquirer — , ,
- listr —
- ncp —
- pkg-install —
في الدليل الجذر ، قم بإنشاء ملف bin / إنشاء (بدون امتداد) بالمحتوى التالي:
#!/usr/bin/env node
require = require('esm')(module)
require('../src/cli').cli(process.argv)
تحرير الحزمة. json:
"main": "src/main.js",
"bin": "bin/create"
تم تسجيل أمر الإنشاء.
قم بإنشاء دليل src / template ووضع ملفات المشروع هناك ، والتي سيتم نسخها إلى الدليل الهدف.
قم بإنشاء ملف src / cli.js بالمحتوى التالي:
//
import arg from 'arg'
import inquirer from 'inquirer'
import { createProject } from './main'
//
// --yes -y git
// --git -g git
// --install -i
const parseArgumentsIntoOptions = (rawArgs) => {
const args = arg(
{
'--yes': Boolean,
'--git': Boolean,
'--install': Boolean,
'-y': '--yes',
'-g': '--git',
'-i': '--install'
},
{
argv: rawArgs.slice(2)
}
)
//
return {
template: 'template',
skipPrompts: args['--yes'] || false,
git: args['--git'] || false,
install: args['--install'] || false
}
}
//
const promptForMissingOptions = async (options) => {
// --yes -y
if (options.skipPrompts) {
return {
...options,
git: false,
install: false
}
}
//
const questions = []
// git
if (!options.git) {
questions.push({
type: 'confirm',
name: 'git',
message: 'Would you like to initialize git?',
default: false
})
}
//
if (!options.install) {
questions.push({
type: 'confirm',
name: 'install',
message: 'Would you like to install dependencies?',
default: false
})
}
//
const answers = await inquirer.prompt(questions)
//
return {
...options,
git: options.git || answers.git,
install: options.install || answers.install
}
}
//
export async function cli(args) {
let options = parseArgumentsIntoOptions(args)
options = await promptForMissingOptions(options)
await createProject(options)
}
يبدو ملف src / main.js كالتالي:
//
import path from 'path'
import chalk from 'chalk'
import execa from 'execa'
import fs from 'fs'
import Listr from 'listr'
import ncp from 'ncp'
import { projectInstall } from 'pkg-install'
import { promisify } from 'util'
import clear from 'clear'
import figlet from 'figlet'
//
const access = promisify(fs.access)
const copy = promisify(ncp)
//
clear()
// HTML -
console.log(
chalk.yellowBright(figlet.textSync('HTML', { horizontalLayout: 'full' }))
)
//
const copyFiles = async (options) => {
try {
// templateDirectory - ,
// targetDirectory -
await copy(options.templateDirectory, options.targetDirectory)
} catch {
//
console.error('%s Failed to copy files', chalk.red.bold('ERROR'))
process.exit(1)
}
}
// git
const initGit = async (options) => {
try {
await execa('git', ['init'], {
cwd: options.targetDirectory,
})
} catch {
//
console.error('%s Failed to initialize git', chalk.red.bold('ERROR'))
process.exit(1)
}
}
//
export const createProject = async (options) => {
//
options.targetDirectory = process.cwd()
//
const fullPath = path.resolve(__filename)
//
const templateDir = fullPath.replace('main.js', `${options.template}`)
options.templateDirectory = templateDir
try {
//
// R_OK -
await access(options.templateDirectory, fs.constants.R_OK)
} catch {
//
console.error('%s Invalid template name', chalk.red.bold('ERROR'))
process.exit(1)
}
//
const tasks = new Listr(
[
{
title: 'Copy project files',
task: () => copyFiles(options),
},
{
title: 'Initialize git',
task: () => initGit(options),
enabled: () => options.git,
},
{
title: 'Install dependencies',
task: () =>
projectInstall({
cwd: options.targetDirectory,
}),
enabled: () => options.install,
},
],
{
exitOnError: false,
}
)
//
await tasks.run()
//
console.log('%s Project ready', chalk.green.bold('DONE'))
return true
}
نقوم بتوصيل CLI (في الدليل الجذر):
yarn link
إنشاء الدليل والمشروع الهدف:
mkdir test-dir cd test-dir create-modern-template && code .


تماما. CLI جاهز للنشر.
نشر حزمة إلى سجل npm
لكي تتمكن من نشر الحزم ، تحتاج أولاً إلى إنشاء حساب في سجل npm .
ثم تحتاج إلى تسجيل الدخول عن طريق تشغيل أمر تسجيل الدخول npm وتحديد بريدك الإلكتروني وكلمة المرور.
بعد ذلك نقوم بتحرير package.json وإنشاء ملفات .gitignore و .npmignore و LICENSE و README.md (انظر مستودع المشروع).
نقوم بحزم ملفات المشروع باستخدام الأمر npm package. نحصل على الملف create-modern-template.tgz. ننشر هذا الملف عن طريق تشغيل الأمر npm publish create-modern-template.tgz.
عادةً ما يعني الحصول على خطأ أثناء نشر الحزمة أن الحزمة التي تحمل الاسم نفسه موجودة بالفعل في سجل npm. لتحديث حزمة ، تحتاج إلى تغيير إصدار المشروع في package.json ، وإنشاء ملف TGZ مرة أخرى وإرساله للنشر.
بمجرد نشر الحزمة ، يمكن تثبيتها مثل أي حزمة أخرى باستخدام إضافة npm i / yarn.
كما ترى ، فإن إنشاء CLI ونشر الحزمة في سجل npm أمر بسيط.
أتمنى أن تجد شيئًا ممتعًا لنفسك. شكرا لك على الاهتمام.